Difference between revisions of "Incoming Web Service Requests Tutorial"
| Line 24: | Line 24: | ||
=== 2: Creating the Web Service === | === 2: Creating the Web Service === | ||
| − | + | Once a Task is created exposing it as a Web Service is extremely straight forward. First launch the [[Live Tasks Queue]]. Click on the third tab (Web Service Processes) and then drag the Task into the main table. You'll then be presented with the Web Service Properties Dialog: | |
| + | |||
| + | |||
| + | http://www.international-presence.com/wikidocs/images/ws_tutorial_1.png | ||
| + | |||
| + | * The alias represents the name of the Operation that will be called and is auto-generated based on the Task name. Feel free to change this, or leave it as it is. | ||
| + | |||
| + | * It's always a good idea to add documentation to the Web Service itself and to any parameters. | ||
| + | |||
| + | * Make sure "Task is active" is checked and that "One Way" is not checked. | ||
| + | |||
| + | * Copy the [[WSDL]] location to your clipboard as you will need this later when calling the Web Service. | ||
| + | |||
| + | * Click the "Get Task Parameters" button to map the incoming and outgoing variables to Web service parameters: | ||
| + | |||
| + | http://www.international-presence.com/wikidocs/images/ws_tutorial_2.png | ||
| + | |||
| + | Click okay to return to the Web Services properties screen. You can double click on the parameters to set the data type (which should be "double" for both parameters) and to add documentation. | ||
| + | |||
| + | This should be all you need to do - click Okay and you should see your Task in the Web Services list. | ||
| + | |||
| + | That's it! | ||
| + | |||
| + | === Testing your Web Service === | ||
| + | |||
| + | Now to test out our newly created Web Service. Create another new Task and drag a [[Web Service Call]] Node into the Task canvas. The first thing we need to do is set the WSDL location which you copied from the Web Service properties dialog. Click the "New" button, select "On the Internet" and enter the URL. This will be of the form: | ||
| + | |||
| + | http://[servername]:[port]/[wsdl_location] | ||
| + | |||
| + | Where [servername] is the hostname of a machine running the Presence [[HTTP Server]], [port] is the port it is listening on - this is 80 by default unless you have changed it in the http.config file, and [wsdl_location] is the WSDL document location displayed on the Web Service Properties dialog. | ||
| + | |||
| + | So, here at the Presence development labs we have a server named "presenceserver" and this is the WSDL location we used for this project: | ||
| + | |||
| + | http://presenceserver/Presence/Web_Service_Tutorial.wsdl (don't click this - it won't work). | ||
| + | |||
| + | Note that the port is not included in the URL as 80 is the default port for HTTP requests and is therefore unnecessary. | ||
Revision as of 15:10, 21 July 2010
| Tutorial Pages > Incoming Web Service Requests Tutorial |
This document gives a step-by-step guide to exposing a Presence Task as a Web Service.
1: Creating the Task
The first step is to create our Task. For the purposes of this demonstration we will create a Web Service that calculates the circumference of a circle given the radius. The Task to do this is very simple and comprises of:
- Start of Task Node
- Require Variable Node - ${radius}
- Set Variable Node - ${circumference}
- End of Task Node
The variable ${radius} will be an incoming parameter and ${circumference} will be an outgoing parameter.
To calculate the circumference we call the following function in our Set Variable Node (3):
&eval {"2 * ${radius} * PI"}
Here is a view of the Task, which can be downloaded here:
http://www.international-presence.com/wikidocs/images/calc_circumference_taskview.png
2: Creating the Web Service
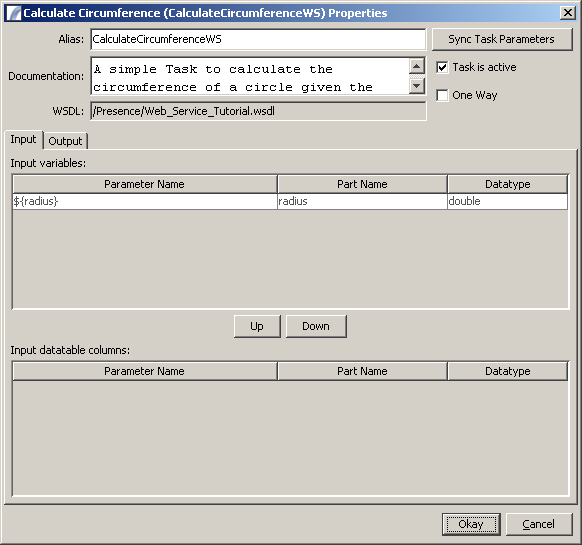
Once a Task is created exposing it as a Web Service is extremely straight forward. First launch the Live Tasks Queue. Click on the third tab (Web Service Processes) and then drag the Task into the main table. You'll then be presented with the Web Service Properties Dialog:
http://www.international-presence.com/wikidocs/images/ws_tutorial_1.png
- The alias represents the name of the Operation that will be called and is auto-generated based on the Task name. Feel free to change this, or leave it as it is.
- It's always a good idea to add documentation to the Web Service itself and to any parameters.
- Make sure "Task is active" is checked and that "One Way" is not checked.
- Copy the WSDL location to your clipboard as you will need this later when calling the Web Service.
- Click the "Get Task Parameters" button to map the incoming and outgoing variables to Web service parameters:
http://www.international-presence.com/wikidocs/images/ws_tutorial_2.png
Click okay to return to the Web Services properties screen. You can double click on the parameters to set the data type (which should be "double" for both parameters) and to add documentation.
This should be all you need to do - click Okay and you should see your Task in the Web Services list.
That's it!
Testing your Web Service
Now to test out our newly created Web Service. Create another new Task and drag a Web Service Call Node into the Task canvas. The first thing we need to do is set the WSDL location which you copied from the Web Service properties dialog. Click the "New" button, select "On the Internet" and enter the URL. This will be of the form:
http://[servername]:[port]/[wsdl_location]
Where [servername] is the hostname of a machine running the Presence HTTP Server, [port] is the port it is listening on - this is 80 by default unless you have changed it in the http.config file, and [wsdl_location] is the WSDL document location displayed on the Web Service Properties dialog.
So, here at the Presence development labs we have a server named "presenceserver" and this is the WSDL location we used for this project:
http://presenceserver/Presence/Web_Service_Tutorial.wsdl (don't click this - it won't work).
Note that the port is not included in the URL as 80 is the default port for HTTP requests and is therefore unnecessary.