Fax Attendant 400
Fax Attendant 400 is a browser-based utility application which runs on your iSeries along with the TF400 messaging software. It allows you to monitor and view messages, the status of your TF400 drivers, and the system health. It also alerts you via email or via iSeries message queues if it notices problems with message delivery.
Contents
Prerequisites
The following are non-charge IBM prerequisites for the optional Fax Attendant 400, TF400 P6.xx Native / Cloud drivers for iMPS2 and iMPSCloud fax systems.
V5R4
| 5722JV1 | Option 7 | Java Developer Kit 5.0 |
| 5722JV1 | Option 8 | J2SE 5.0 32 bit |
| 5722SS1 | Option 33 | Portable Application Solutions Environment |
V6R1 & V7R1
| 5761SS1 | Option 33 | Portable Application Solutions Environment (V6) |
| 5770SS1 | Option 33 | Portable Application Solutions Environment (V7) |
| 5761JV1 | Option 8 | J2SE 5.0 32 bit |
| 5761JV1 | Option 9 | J2SE 5.0 64 bit (not crucial but suggested) |
or
| 5761JV1 | Option 11 | J2SE 6.0 32 bit |
| 5761JV1 | Option 12 | J2SE 6.0 64 bit (not crucial but suggested) |
Options 11 – 12 are preferred for V7R1.
Additionally, Fax Attendant requires access to an SMTP server, and the HTTP port on your iSeries needs to be open - by default Fax Attendant runs on port 85.
Installing Fax Attendant 400
Fax Attendant 400 is automatically installed with version 6.5.4 of the TF400 software and later. Install the TF400 software as normal. Instructions for downloading the current PTF are supplied below:
The latest TeleFax400 Install / PTF can be downloaded in Zip format from the following locations:
If you wish to burn a CD/DVD from the downloaded file using PC burning software
http://www.international-presence.com/software/TF400RELP6ISO.zip
Once download is complete, you will need to extract the TF400 ISO file from the Zip file. The ISO file can then be used to create a CD with any CD creation software you prefer.
Alternatively, if you wish to FTP the file to the AS400 in order to use with IBM’s Virtual CD support, then
http://www.international-presence.com/software/TF400RELP6VCD.zip
Once the PTF is installed, you will see the following option under Associated Tasks (from the TLX menu, go to Option 11 then type a 9 next to "Associated Tasks" and press return):
http://www.international-presence.com/wikidocs/images/faxattendant_400_assc_tasks.png
From here you can start and stop the service by entering a 1 or a 0 next to the FAXATTD Job.
In order to allow Fax Attendant to start automatically, the following data area must be set
[TLXLIB]/FAXATD = '1'
Where [TLXLIB] represents the TLX file library (for example TLXP).
License Code
Fax Attendant 400 also has an associated data area which contains the product license code. This will be supplied by International Presence and should be entered into the following data area:
[TLXLIB]/EXPATD
Browsing to Fax Attendant
Open your Web Browser and access Fax Attendant via the following URL:
http://[iseries_hostname]:[port]/
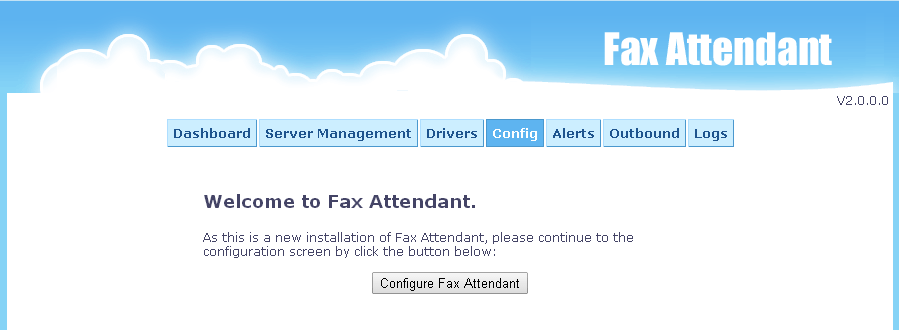
[iseries_hostname] represents your iSeries hostname or IP address. [port] represents the port that Fax Attendant is listening on - typically port 85 by default. If the iSeries firewall does not block the port, and if the software is running correctly, you should see the following welcome screen:
http://www.international-presence.com/wikidocs/images/faxattendant400/config_1.png
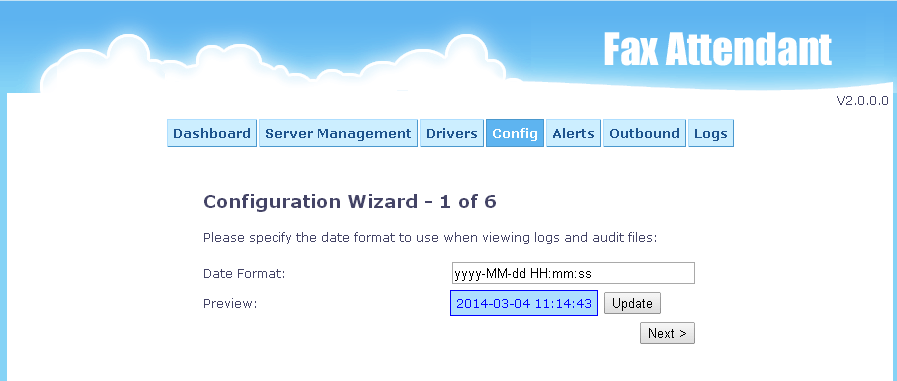
Click "Configure Fax Attendant" to continue:
http://www.international-presence.com/wikidocs/images/faxattendant400/config_2.png
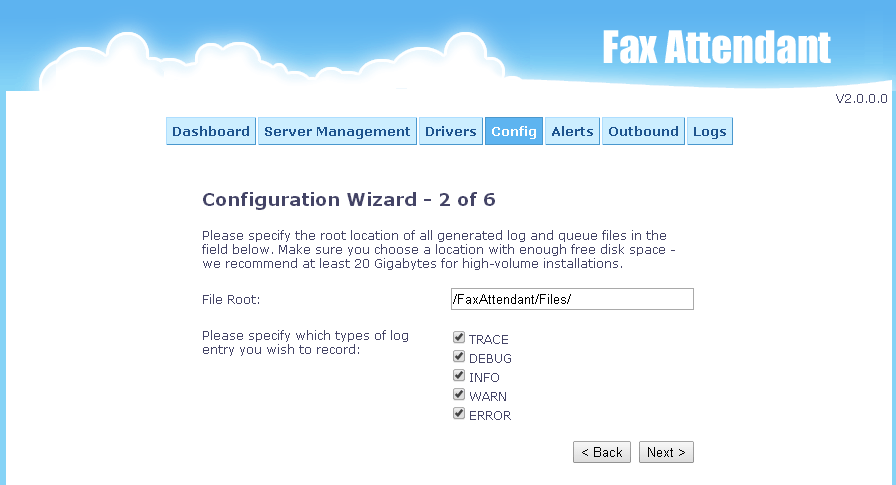
Here you can specify the time and date format in system logs etc. Click "Update" to refresh the preview. When done click "Next >" to view the next screen:
http://www.international-presence.com/wikidocs/images/faxattendant400/config_3.png
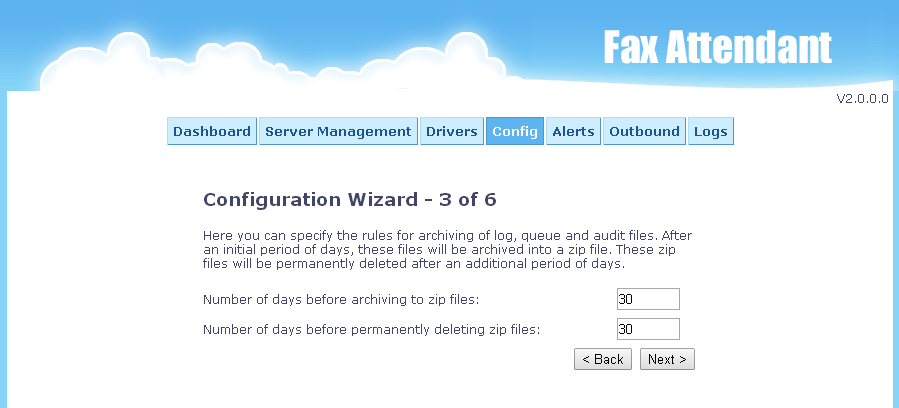
This tells Fax Attendant where on the iSeries IFS to store its temporary / working files. The default is the /FaxAttendant/Files/ folder in /Root. This screen also allows you to specify which types of logging you would like to store in the logs files. Click "Next >" to continue.
http://www.international-presence.com/wikidocs/images/faxattendant400/config_4.png
This screen allows you to specify the length of time that files should be retained before being automatically archived and cleaned. Once the first number of days has elapsed files are added to zip archives, then when a further n days have elapsed these are permanently deleted.
http://www.international-presence.com/wikidocs/images/faxattendant400/config_5.png
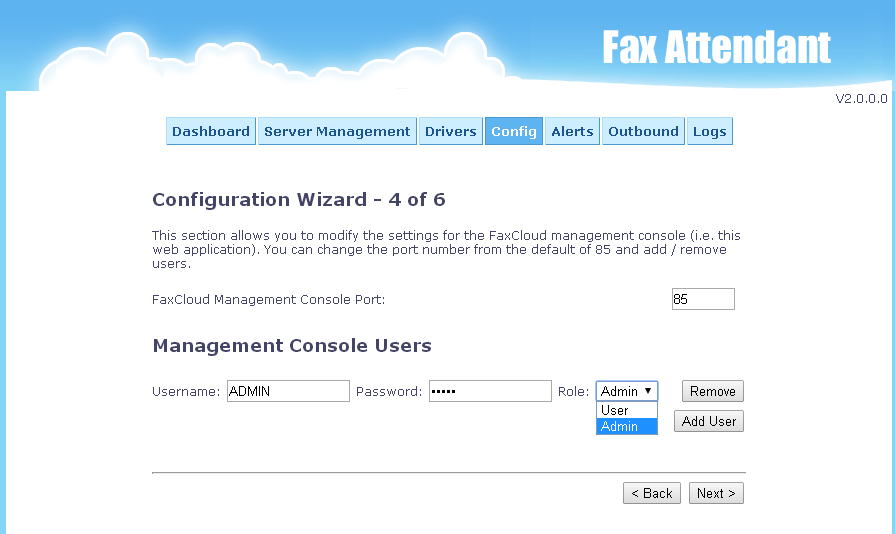
This is the penultimate configuration screen and allows you to specify the web server preferences - ie the port that Fax Attendant runs on, and users who are permitted to access it.
You can change the port from the default (85) by entering a new value into the field labelled "FaxCloud Management Console Port".
Notes on Permissions
By default there are no users set up for access to FaxAttendant 400. This means that anyone can browse to the URL and have full control and access. This probably isn't what you want in a live environment.
Once a user has been created, general access is disabled. To create a new user, click the "Add User" button. You can now enter a username and password and select "User" or "Admin" role. Users with "User" role only have access to the dashboard, alerts, outbound, logs screens. Users with "Admin" privileges can also access the configuration screens.
Once you have created your users, click "Next >" to continue to the final configuration screen:
http://www.international-presence.com/wikidocs/images/faxattendant400/config_6.png
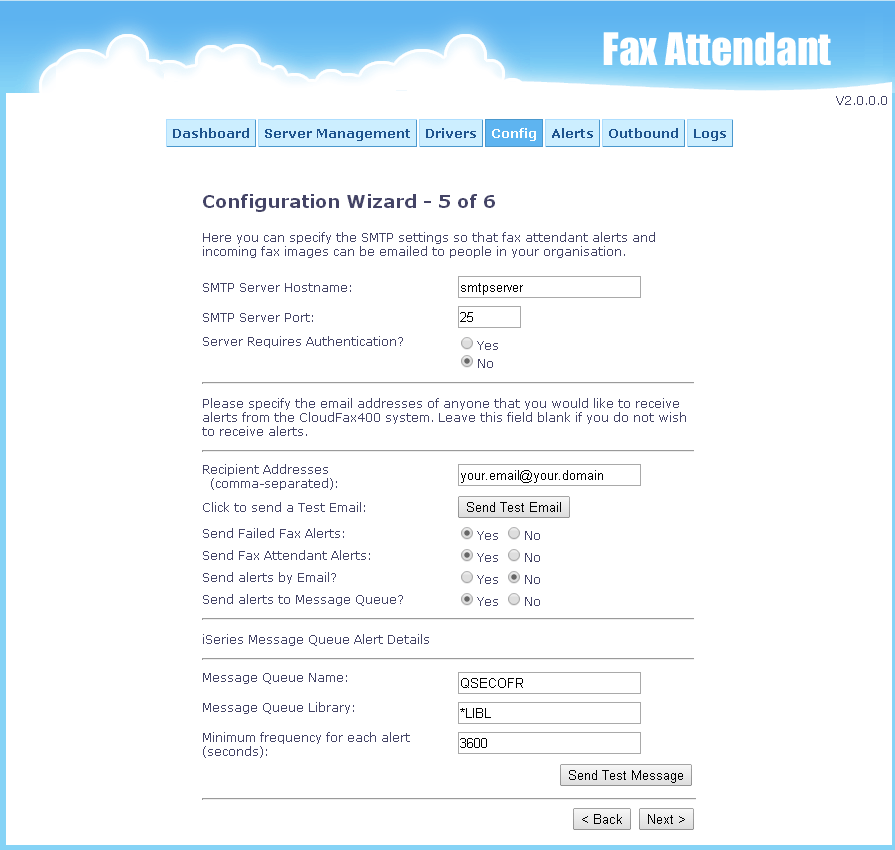
Here you can set up your SMTP server (for outgoing emails) and alert preferences including iSeries Message Queues.
If your SMTP server supports TLS or SSL encryption, you can specify the protocol by pre-pending the URL as follows:
SSL://smtp.host.com
or
TLS://smtp.host.com
Consult your mail server documentation to find out which method is preferred and which port is used. For GMail servers, use port 587 for TLS and port 465 for SSL.
Click the "Send Test Email" button to ensure that the settings are correct. If you do not wish to receive email alerts, select "No" for the appropriate options.