Task Designer
| Administration Client > Task Designer |
Contents
Using the Task Designer
The Task Designer Interface is the starting point for creating a Presence Task. You can think of it like a canvas on which you can put the components that make up the Task itself.
Creating a Simple Task
The easiest way to get used to using the Task designer is by creating a very simple Task. We don't want to get into the specifics of the various Task Elements just yet, so we'll stick to the basics of creating a Task, adding Task Elements to it, and specifying the execution sequence (i.e. joining them up).
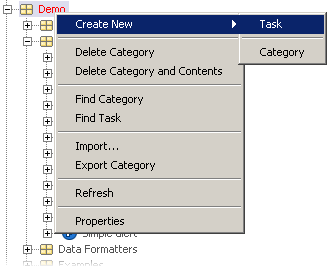
First we'll create a new Task. Select the Demo category (on the left hand side of the Administration Client labelled "Task Explorer"). Right click on the Category name, the select "New > Task" from the pop-up menu.
You'll then be presented with the Task Options dialog. For now just give the Task a name (e.g. My First Task). You can leave everything else as it is, and click Okay.
Your new Task has now been created, and you can see it under the Category. You can also see that the Design View is now a blank canvas, waiting to be filled with Task Elements.
Adding Task Elements
Let's grab a "Start of Task" node first, the sensible place to begin your Task. Select it from the "Flow Control" panel above the Design View, and drag it onto the canvas. Somewhere towards the left hand side is good, as Tasks typically run from left to right.
Next add a "Passive Node". You can also find this under the Flow Control nodes. Drag this into your canvas and place it to the right of the "Start of Task" node.
Last but by no means least, let's add an "End of Task" node to the right of this. Your Task view should now look something like this:
If your Task looks anything like this, great. The final step in this introduction is to join the Task Elements together.
Joining the Task Elements
Move your mouse so that it is to the right of the "Start of Task" icon, and the cursor should turn into a hand. Hold down the left mouse button to begin dragging a new connection from this Node. A wire will now appear, rooted to the Start of Task Node. Experiment with moving it about, and when you're ready try moving the end of the wire to the left-hand side of the "Passive Node" icon where it should snap into place. When it looks right release the mouse button and you will see an arrow now joins up these two Nodes:
Repeat this step between the "Passive Node" and the "End of Task" node so that your new Task looks something like this:
Congratulations - that's the basics of creating a Task covered. Essentially what this describes is as follows:
- First run the "Start of Task" node.
- Next run the "Passive Node"
- Finally run the "End of Task" node.
If you were to run this Task very little would happen (except some entries to the log files). But we have now gone over one of the main fundamentals in Task building.
Notes on concurrent editing
When you open a Task for editing a lock is placed on the Task to reduce the risk of concurrent editing. While the Task is open anyone who attempts to open it will be presented with a notification advising them of the username and hostname of the person that is already editing it. This lock can be overridden by Presence users with Administrator status.
See also Execution Paths
Architecture > Administration Client > Task Designer
| Task Explorer | Resources Explorer | Task Designer |
| Menu Options | Toolbar Items |


