SQL Statement Nodes
Contents
SQL Statement Nodes
SQL Statement Nodes allow you to run SQL statements against a JDBC-compliant data source such as Oracle, Microsoft SQL Server, MySQL, etc.
To create a new SQL Statement Node, right click in your Task View and choose "Create New > SQL Statement" from the pop-up menu.
Please note that SQL Statement Nodes are reusable. This means that once created an SQL Statement Node can be re-used in other Tasks. Changes to one instance of the SQL Statement will affect all other references, and a warning dialog is shown when this is attempted.
The SQL Statement Editor
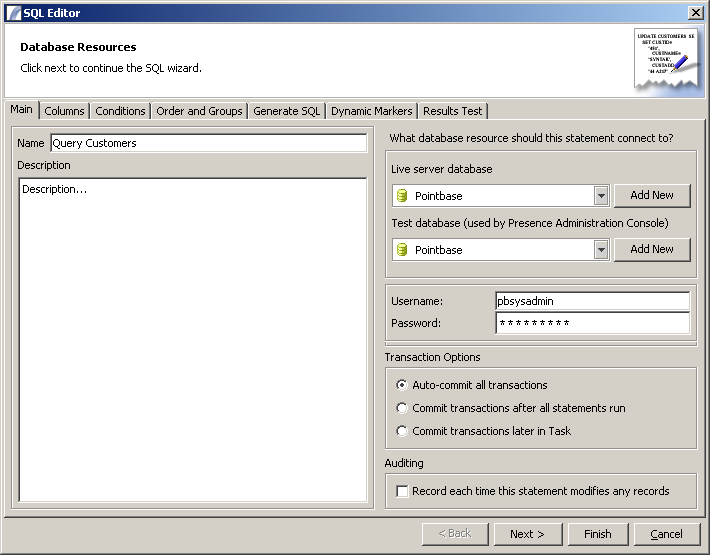
The first tab viewed when launching the SQL Editor is the "Main" tab, which prompts the user to enter a name and description for the query and to select the Database Resource:
Main Options
Live Server Database This is the Database Resource that the Presence server should connect to.
Test Database This is the database that the SQL editor will connect to for testing. It may be the same as the Live Server Database.
Username / Password This is the username and password that should be used to connect to the database.
Transaction Options
- Auto-commit all transactions: Individual updates, deletes etc will be committed as soon as they are executed, providing no roll-back functionality.
- Commit transactions after all statements run: In cases where multiple statements are ran, all will be committed once they have all run. If one statement fails, none will be committed.
- Commit transactions later in Task: Updates are left uncommitted. They will be automatically committed after a successful Task completion and automatically rolled back if the Task fails. Alternatively you can use the Roll Back Transactions and Commit Transactions Nodes to do this manually according to Task logic.
Auditing
If the "Record each time this statement modifies any records" checkbox is selected a new entry will be made into the Activity Archive each time this Node executes. Regardless of whether it is checked, errors should always be recorded.
Columns Panel
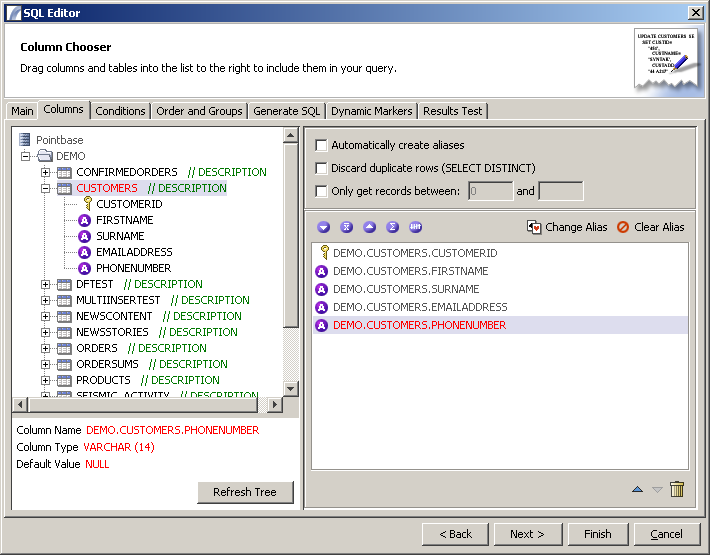
When this pane displays it will first attempt to connect to the database in order to query the database metadata (the underlying structure of the database including schemas, tables and columns).
Here you can include or exclude database table names and schema names to restrict the database structure tree. Clicking Okay will cause the structure tree to be loaded into the left hand pane. Selecting a column will bring up extra information in the panel below the tree.
To include columns in your query just drag individual columns or entire tables into the list panel to the right.
Automatically Create Aliases - when dragging columns an alias will automatically be assigned to the column name. In the final query, columns will be referenced "AS" the alias. Select a column and click the "Change Alias" button to over-ride the automatic alias generated. To remove the alias, select the column and click "Remove Alias".
Discard Duplicate rows This will cause the final SQL statement to use the "DISTINCT" keyword, if a SELECT statement is to be generated.
Only get records between ... and ... This will cause the Presence server engine to discard all results outside this range. Leave the second field blank if you just want to skip the first n records but include all the rest.
Database Schemas
When you connect to a database engine Presence downloads the specified Schema information and stores it to save you having to continually connect / refresh. You will only need to refresh this list if new schemas, libraries, tables or fields have been added.
The returned Schema forms a tree structure, however different database vendors represent this hierarchical list in different ways:
Databases which use both a Schema and a Catalog (Microsoft SQL Server Etc)
Database Resource +
 DATABASE CATALOG +
   DATABASE SCHEMA +
    TABLE +
     FIELD
Databases which use a Schema (Db2, Oracle, Etc)
Database Resource +
 DATABASE SCHEMA +
  TABLE +
   FIELD
Databases which use a Catalog (Microsoft Access Etc)
Database Resource +
 DATABASE CATALOG +
  TABLE +
   FIELD
Databases which use simple Tables (Dbase, Etc)
Database Resource +
 TABLE +
  FIELD
Conditions Panel
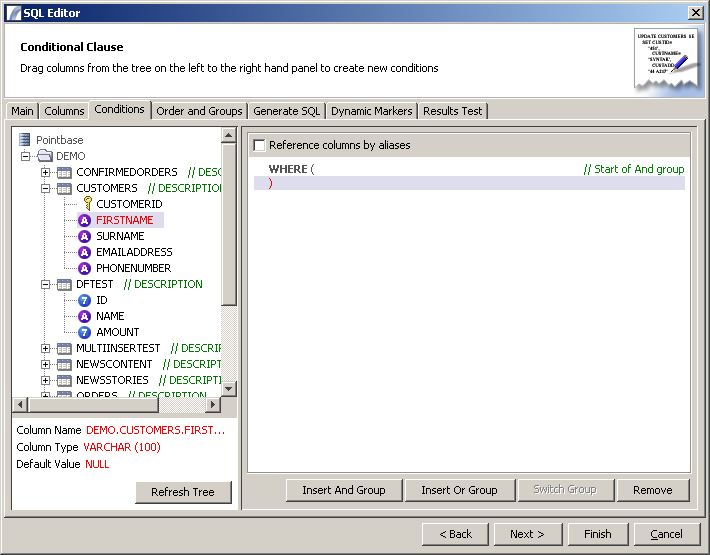
This panel provides an intuitive drag-and-drop interface for creating the conditions for the "WHERE" part of your SQL Query. To add a condition to the WHERE clause, drag a column name from the metadata tree and drop it into the main panel. By default the "AND" operator will be used when multiple columns are added, for example:
WHERE SURNAME LIKE 'P%' AND COUNTRY = 'UK'
Using the "Switch to OR Group" will change this to be
WHERE SURNAME LIKE 'P%' OR COUNTRY = 'UK'
Additionally you can create AND / OR subgroups (nested conditions) to build more complicated queries such as:
WHERE (SURNAME LIKE 'P%' OR SURNAME LIKE 'Q%') AND COUNTRY = 'UK'
Dynamic Markers
Dynamic Markers are useful when you don't know what the value specified in a query will be. This may be because you are including data from an earlier query, or a dynamic variable. The actual value of the dynamic marker will be substituted by Presence when the Task runs.
To specify a Dynamic Marker value, use a question mark (?) instead of a literal value. For example, the above example conditional clause could be rewritten as:
WHERE (SURNAME LIKE ? OR SURNAME LIKE ?) AND COUNTRY = ?
Order and Groups
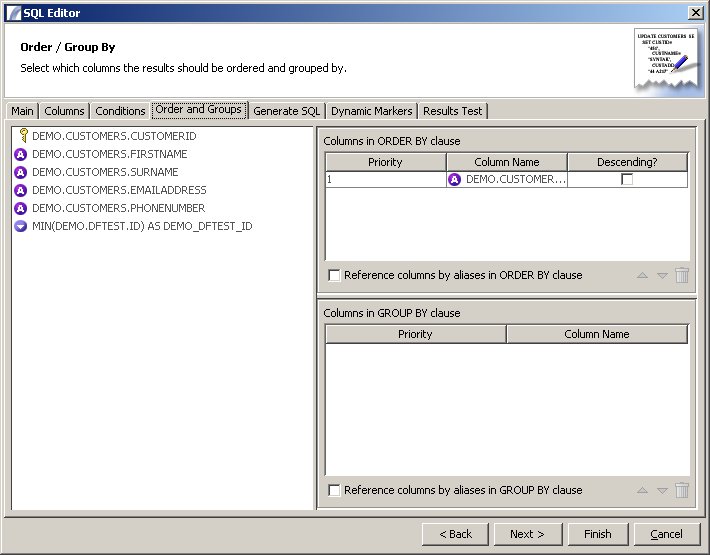
This panel allows users to specify the sort-order of any results returned (the ORDER BY clause) and the columns that should be grouped in the GROUP BY clause of the SQL Statement.
To add columns to either panel, drag them from the metadata tree on the left hand side of the screen.
Some databases require columns to be referenced by their alias (if specified) instead of the original column name. For this reason we have provided the "Reference columns by alias" for both the GROUP BY clause and the ORDER BY clause.
Generate SQL Statement
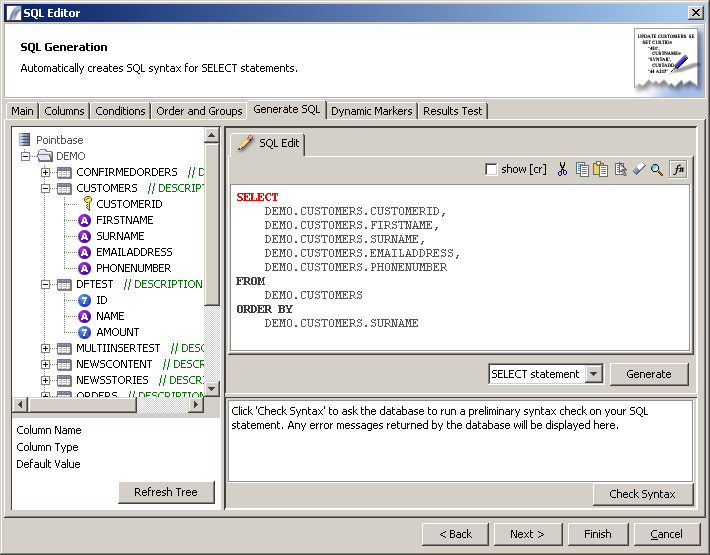
This panel creates the SQL statement based on the actions taken in the previous panels. You can use this panel to create a SELECT statement, an INSERT, an UPDATE or a DELETE.
Choose the type of Statement you want to generate and then click on the "Generate" button. The generated SQL statement will appear in the pane above.
If you want to verify the validity of your statement, click on the "Check Syntax" button. This will perform a syntax check against the database (which may not report errors).
Dynamic Markers Panel
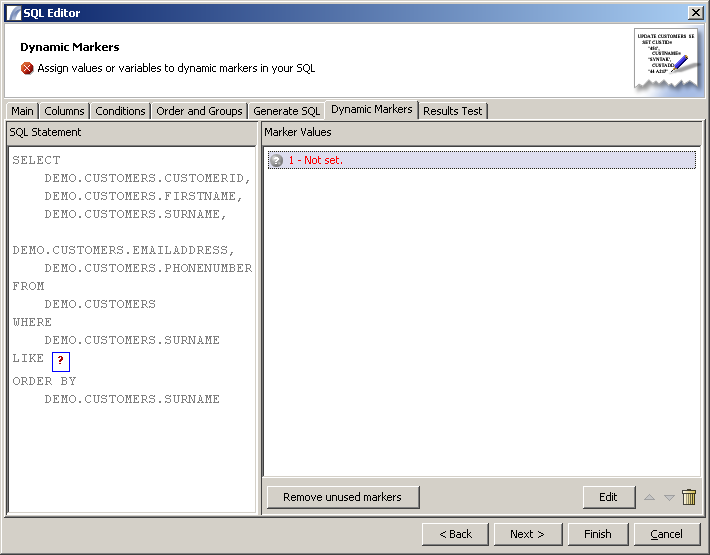
This allows you to specify the values of any dynamic markers present in the query. These are identified by the ? character (without quotes).
To set a value, either click on the ? (highlighted in red) in the left hand pane, or select the item from the list (main panel) and click "Edit". You will be presented with an input dialog where you can enter the value (usually a data reference such as :var{COLUMN_NAME} or a variable such as ${var}) and the data type.
Results Test
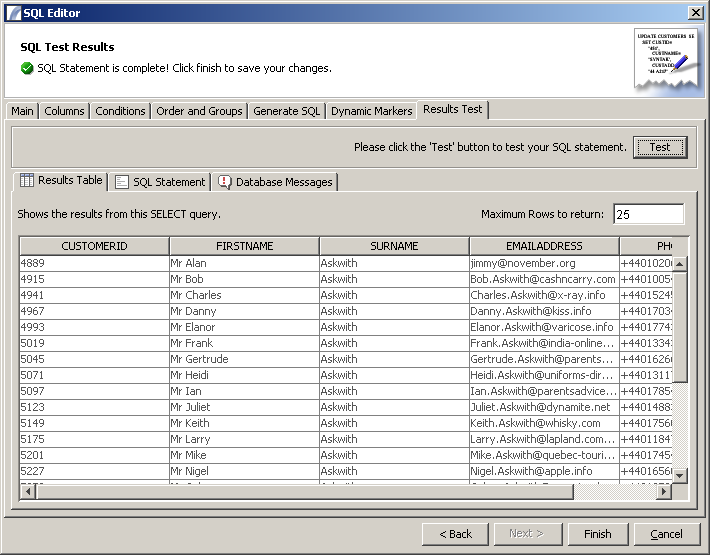
This panel allows you to test the results of your query or statement. Click the "Test" button to check that the results you receive are as expected.
The results of the query (if it is a SELECT query) will be displayed in a table (as illustrated). Any messages from the database (errors or otherwise) can be viewed by clicking the "Database Messages" tab. To review the statement which was executed, click the "SQL Statement" tab.
When you have finished with your SQL Statement, click "Finish" to save it.
Query Results
What happens to the results from SQL Queries when they are run as part of a Presence Task?
The table of data is stored in memory in the Presence Context. Values can be referred to in subsequent Nodes using the column reference convention, which is:
:var{COLUMN_NAME}
Query Optimisation
Creating an SQL query which examines a hundred columns containing 100,000 records will cause your database server to run extremely inefficiently, and cause delays in Presence returning results.
If you do use Presence to present large volumes of data you should make sure that the server has large amounts of system memory available, and that your database server is able to withstand the large query without affecting its production functions.
Query Optimisation
There are a number of ways you can reduce the performance overhead of any query:
Most Exclusive Filter First. Where you have multiple criteria, pick the most limiting criteria first.
Consider a query as a filter. If you have only one criteria, then you have only one filter. Usually you will have multiple filters. Each filter is applied in the order you list them. Some criteria may only filter out a few records, while others may halve the results or cut them even further. An excellent way of optimising a query is to select the criteria which will filter out the most results first, that is, the most exclusive. Each subsequent criterion then has to look at a much smaller result set.
For example, you have an inventory database, which has 5 main product groups, but thousands of individual products. You wish to set different minimum stock levels for each of the 5 main product groups. In this case your first criteria should be the product group selection, as that will immediately filter out 80% of the data.
NOTE - some DBMS' will optimise your queries for you at run time and will automatically use the most efficient order for your SQL conditions. However it is still good practice to think this out first.
Use Logical files / Views rather than Physical files / Tables
A logical file or view is essentially a virtual table. It is based on the data in a table, but it has no existence in and of itself. It is essentially a table which has already been filtered for you. A view contains only a subset of the columns and rows from the table.
Views exist to speed up access to data. Databases will often contain a large amount of data relevant to your business, but each business unit or department only wants to see the data relevant to them. The accounts department don't want to waste time loading data relating to the IT department for example.
If a view exists that already contains the data you are interested in, then it is much more efficient to use the view. Why waste time running a query which uses six filters on the data, when a view exists that already uses four of those filters?
Querying a view is obviously much quicker than querying a source table.
NOTE - some DBMS' will automatically select a view for you when you request a table / physical file. However, unless you are certain your database will do this for you it is good practice to specify a view manually . Indexes
Data in tables usually appears in the order it was entered into the table, not sorted by any specific field. Sorting through data in such a table can be extremely time consuming. It would not be unrealistic to say that processing a table without an index can take 200 times longer. This may not seem to be a problem, but when you are looking at many thousands of records this might be the difference between 5 seconds and literally hours.
An index is a "quick reference" to data in a table, providing a view of the data sorted by one or more key columns. The index has a performance overhead of it's own, but as the indices are maintained by the Database Management software it is a fairly efficient process, certainly compared with simply throwing a large complex query at a non indexed file on the database server.
Use Date Criteria
Wherever you have date fields in your data you should use these to limit the results. This will greatly reduce the result set and speed up your queries.
Performance Monitoring
Once you have created your queries, we recommend you use the Task Statistics Console to monitor the SQL run time or other bottlenecks.
See also:Database Resource#Overriding values via variables, Database Connectivity and Database Resource
See Also
Task Elements : Data Accesss Task Elements : SQL Statement Nodes
| SQL Statement Nodes | Object Monitor Nodes | XML Query Nodes | Mail Scanner Nodes |
| Web Services Nodes | LDAP Query Nodes | JSON Node | Flat File Parser | Data Table Nodes | Variable Nodes |
| Transaction Control Nodes | Context XML Nodes |
